
VanRoey » The Digital Workplace » Webstore Tutorials
Webstore Tutorials
With technical questions, problems or support you can go to Support@vanroey.be Preferably with a clear description and screenshots.
Attention; When contacting us, we expect you to have gone through the information below thoroughly. If, however, support has to be provided on the matters below, this service will be invoiced.
Essentials / Introduction / Knowledge Base
(1st item will not be displayed)
We call your new webstore part of our 'Webstore platform' because it works seamlessly with our other solutions such as SalesApp, FormBuilder, AppConstructor, City-App, PresentationApp etc... The idea behind this is that you enter your offer once (or link it to your own company database) and both your shop and all other applications are now fed and managed from one central database.
You can easily create your own pages, manage and edit menus, which is why the platform is not limited to the shop. So feel free to create a home, about- or contact page or start a blog. This way, you save yourself the cost of a website and you manage everything from the same Back-end.
When you start a Webstore with us, we first provide a protected environment on "organisationaam.i2ct.eu". This environment is not yet indexed by Google and can only be visited by people who have this link, so you can extensively test, make mistakes and revise without reaching the general public. The intention is that, as soon as you feel that the entire shop is ready for the general public, we move the site permanently to www.uworganisatie.be..
Important tip when creating links and references:
- For external links such as Facebook, twitter, partners... always use the full URL: http://facebook.com and choose 'open in new window' to keep people from being distracted from your own webstore. Be sure not to forget to always http://www to be mentioned.
- All internal links to photos, media, pages, products... within your webstore can be linked to e.g. "http://organisatienaam.i2ct.eu/image/product/1.jpg". By deleting your domain and starting from the "forward slash" /, your webstore automatically stays in the same domain. This is not only easier, but in this way we prevent that when your organization.i2ct.eu moves to www.uworganisatie.be, old, erroneous links to the .i2ct.eu domain will be left over.
Only when you log in as an administrator (Admin) can you access the 'backend'. Via www.uwdomein.be/admin you will find yourself 'behind the scenes' of your Webstore where you can configure everything down to the smallest details. Your visitors will never get to see this Back-end.
With 'Front-end' we include everything that your visitor sees and how he experiences the site, i.e. the final webshop and site. Here you can see the results of all your work behind the scenes in the Back-end. Products, pages, overviews, notifications, translations... are displayed in the Front-End, styled by your own Template.
With the 'Template' or the 'template' of your site we mean the appearance, usually with your logo at the top and adapted as well as possible to your house style or colour palette. Your Template determines where, for example, product photos and -descriptions will be placed on pages, the menu, where is the button to register... In short, all the things that you cannot change with the page content editor are pre-programmed in the Template.
Today, we only offer Responsive (or 'adaptive') Templates, which means that your Webstore adapts itself neatly to the screen size of the visitor. If you are visiting your site via smartphone, tablet or PC, we guarantee a pleasant, adapted experience on all platforms.
Attention, depending on your template, certain things that can be configured in the Back-end may not be displayed in the Front-End. For example, if you don't need product descriptions, they may be disabled.
Occasionally you can use 'Wildcards' in the Back-End, which are pieces of text that will be filled in automatically by the platform. You can make the message "Welcome to our site": "Day %first_name%, Welcome to our site", which will personally address users. There is a large list of wildcards, but not all wildcards can be used just anywhere, so if you want to make adjustments to E-mailtemplates, pages or translations, you should first test the result.
The overview of all wildcards can be found here:
confirmer:
- %billing_info%
- rt_subtotal%
- rt_total%
- rt_vessel%
- tegory%
- % Comment%
- %discount code%
- %domain%
- %extid%
- %first_name%
- %image%
- %last_name%
- %link%
- %nr%
- %orderid%
- %part_nr%
- %paymentmethod%
- %price%
- %price_excl%
- %price_incl%
- % product%
- %product_link%
- %qty%
- %shipping%
- %shippingaddress%
- %summary%
- %total%
- %vessel%
- %voucher%
- % website%
desiredprice:
- %customer.email%
- %customer.name%
- %customer.phone%
- %product.id%
- %product.name%
- %product.price%
- %product.url%
- %shop.url%
- %shop.product_price%
- order survey:
- %domain%
- %email%
- %first_name%
- % website%
presentation:
- %image%
- %link%
- %nr%
- %price%
- % product%
- %summary%
- %total%
- %vessel%
registration:
- % code%
- %domain%
- %first_name%
- % website%
recoverpassword:
- %authcode%
- %domain%
- %first_name%
- % website%
reset password:
- %domain%
- %first_name%
- %newpassword%
- % website%
sales_comment:
- %answer%
- %company%
- %id%
- %open%
- %question%
- %representative%
- % Timestamp%
- %visitReport%
sales_order:
- %billing.info%
- %billing.title%
- %confirmationLink%
- %company.info%
- %company.enterprise%
- %company.extid%
- %company.mobile%
- %company.name%
- %company.phone%
- %currency%
- %customer.email%
- %customer.firstName%
- %customer.groupId%
- %customer.lastName%
- %customer.mobile%
- %customer.phone%
- livery.cost%
- livery.info%
- livery.warehouseAddress%
- %discount.info%
- %nr%
- %order.id%
- %order.comment%
- %order.date%
- %order.subtotal%
- %order.total%
- %order.vessel%
- %payment.info%
- %product.categoryName%
- %product.extid%
- %product.image%
- %product.imageLink%
- %product.link%
- %product.name%
- %product.partNr%
- %product.price%
- %product.priceExclVat%
- %product.priceInclVat%
- %product.quantity%
- %product.summary%
- %product.total%
- %product.url%
- %product.vat%
- %representative.info%
- %representative.name%
- %representative.phone%
- %representative.email%
- %voucher.info%
- %website.domain%
- %website.url%
- stocknotification:
- %customer.firstName%
- %customer.lastName%
- %product.name%
- %product.link%
voucher:
- %amount%
- % code%
- livery.address%
- livery.city%
- livery.country%
- livery.name%
- livery.zipcode%
- %message%
- % receptor%
- %sendercontactinfo%
- %Sendername%
- %validate%
In the Back-End you will often see a 'Permalink' at the top, which is the definitive link with which you surf to the relevant product, page, blog post, category... This link can also be shared with users on e.g. social media or in email campaigns. A permalink is generated once automatically, but in some cases you can still adjust it as desired. Of course, it is no longer advisable to change the permalink after you have used it in campaigns or other references.
The webstore platform will never sell your products below the specified purchase price, i.e. at a loss or negative margin, regardless of the discounts you grant on price groups, categories or at product level. By default, this safety margin is set at 0%, which means that the absolute minimum sale price will never be less than the purchase price. But you can also let us adjust this safety margin to a higher percentage of your choice.
Users
(1st item will not be displayed)
/admin/users - In the overview you can see all registered users and administrators and in the top right corner there is a dropdown menu that allows you to immediately filter on certain types of users with extra specific rights. You can easily search all users shown by using the filter fields at the top of the email, first name and last name. With the 'Reset' button at the top right you can clear the filter again, you can see their last visit to the site and to deny access to a user you can always deactivate them by clicking on the check mark in the table "Active". Removing users can also be done, but you can also remove the data of customers.
In the table Actions we see 5 icons or options:
- With the pencil you can edit the basic and login data of the user.
- You can configure a new password for the user here.
- Changing his first and last name
- Choose to which (Pricing) group this customer belongs
- Configure its standard language
- Displaying a personal message during login
- Determine whether or not this user can pay by invoice, i.e. with an agreed term of payment.
- The second icon (the standing man) allows you to view, edit or add the user's addresses.
- By clicking on the street name or on the pencil you can edit the address.
- You can -for the user- set an address as 'primary' by which you mark this address as default or as the most important one. He will always be presented with this address by default during his order process.
- You can also delete an address so that the user can no longer see it.
- With the button "+ New Address" you can add a new address.
- Address type" selects whether it is an invoice or a shipping address.
- Then enter the street name + number, postcode, city, country and a telephone or GSM number.
- Click on save to save, or cancel to cancel.
- With the icon of the building you can see if the user belongs to one or more companies.
- In this overview you will see the names of the companies, the Ext ID (the reference to your company software) and the VAT number. These columns are easy to search with the filter fields at the top and telephone numbers are shown to reach the person on this company. The only change you can make here is to delete a company.
- With the sync-icon (2 arrows) you can register as this user. Easy to test by placing an order in his name.
- The lock allows you, as an administrator, to entrust your own rights to colleagues.
- When you click on the field next to 'Permissions Group' you will be presented with the rights that you have, for example if you want to make your colleague a webstore administrator, you can select this field. Click again in the empty space of the field to grant him or her additional rights. Note: when you click on 'Save' your colleague has these rights and he or she can give them away to other users! The user in question has to log out and log in again to get the changed rights.
The last icon, in the export table, is the export function, which is used to include this customer in your linked business software.
We can also create new users by clicking on the button 'New User' at the top right, fill in the correct information, choose the correct (price) group and language, provide a personal message for when he or she logs in and choose if the new user is eligible for payment by invoice. When you click on 'save' your user is created and he or she can log in. in the overview you can always edit the user, add addresses or give him or her rights.
As a last option, you can export your entire user list to an Excel list using the red button at the top right of "Export to Excel". A .xlsx file is generated and downloaded containing the email addresses and first and last names of your users.
/admin/user addresses - This list gives you an overview of all the addresses that have been used or entered by your users. You can also edit them with the pencil or remove them with the red cross. A search and filter function at the top will soon be available.
Companies
(1st item will not be displayed)
/admin/companies - Once you have found a certain company you can use the first icon (the male in the circle) to view the addresses that have been entered. The second icon allows you to list all employees of this company. For each user there is an ID number, for example 5, via the link yourdomain.i2ct.eu or later. www.uwdomein.be/admin/users/edit/id/5you can further edit this user.
/admin/company addresses - This list gives you an overview of all the company addresses that are registered by your users. You can also edit them with the pencil or remove them with the red cross. A search and filter function at the top will be available soon.
Prices
(1st item will not be displayed)
/admin/price groups - With Price Groups you can divide users into price categories, e.g. 'Standard customers' who are offered the standard rate, 'Large customers' with whom an additional percentage discount has been agreed, or 'staff' who can, for example, order your products at a very low margin. The Webstore Platform is intelligent enough never to sell below the purchase price of a product + 'Safety Margin'. This basic margin, which always has to be achieved, is determined when setting up your webstore.
We create a new Price Group by clicking on "+New Price Group" in the top right-hand corner. First you give your new price category a clearly descriptive name and then you decide for yourself, as a percentage (without the character %) or u for this type of customer:
- A standard discount on the sales price on all products?
- A new standard profit margin would like to be introduced on the buying-in price for all products?
Both fields are mandatory, but by entering the value 0 the discount or margin will be ignored. 0 is equal to leaving empty. A standard price group without discounts or adjusted margin would therefore have 0 for both values. For these users, the standard price is shown.
It's not It is advisable to define a margin and a discount in the same price group.
Example: Suppose we have a product that we purchases for €50 and sales for €100.
If we Margin on 10% put for a price group will be the 50€ Purchase price + 10% margin to arrive at a sales price of 55€
If we Discount on 10% put for a price group will be the 100€ Sales price - 10% discount come out at a sales price of 90€
We do, however, have some important comments to make:
- This is the most general, global price setting and it is ignored when there are:
- One percentage point discount or margin is defined on category levelE.g. "-20% discount on all our printers" Results in €80 for all price groups (see chapter Categories) Also this price setting will be ignored when:
- One percentage point discount or margin is defined on product levelE.g. "-30% discount on this specific printer only" Results in €70 for all price groups. (See chapter Products) Also this price setting is ignored when:
- One fixed price is defined on a offspringE.g. "Price is fixed: 79€ and nothing else" Results in €79 for all price groups. And even this price setting is ignored when:
- One Stacking price is defined on a offspringResults in €74 for all price groups, from 2 devices, so there are 5 levels: Scale by product is more important than a Fixed Price on product is more important than a percentage margin or discount on product is more important than margin or discount by category is more important than PriceGroup
- All prices in the platform are cached in order to make your site react faster, i.e. calculated in advance and loaded into the memory so that they do not have to be recalculated again and again. The drastic speed gain that we achieve with this will have some consequences:
- When you assign a user to a new price group via the menu item "Users" (see chapter "Users"), this user has to log in again once before he will see his adjusted prices!
- After changing a margin or discount on a category level the admin has to click 'clear prices'. All prices in the entire platform will be recalculated.
- After changing a margin or discount, or setting a fixed or graduated price for an individual product, you need to click on the 'prices' button in the 'general' tab (see chapter 'Products') and then on 'clear all prices' to provide the product with the new price setting. The new price calculation takes place as soon as the product is shown in the shop.
Products
(1st item will not be displayed)
/Admin/products - The heart of your webstore is here, so it is highly recommended that you watch this video only at the end of the training course. We also recommend that you wait until the last phase to avoid duplication or incompleteness of work, because only when you have understood and configured the platform down to the smallest detail can you get the most out of it.
New Product
With the button at the top right "+New Product" we can create a new product. The number of options is still relatively limited as we first limit ourselves to the basic information. Only after the creation of a new Product(ID) many more options will become available. Together we go over the options:
- Product Name: A commercial, recognizable title for your product, e.g. Iphone 7 128GB White
- Product type: Here we determine what kind of product it concerns:
- Normal product: A standard product that you can easily obtain.
- Pre-order: The product is not yet on the market, but your customers can already reserve it. You can put the product online with stock "0" and only if customers want to have it delivered will they have to pay in advance. (The setting "Hide products without stock = yes" will be bypassed) The button "add to shopping cart" is in this case changed to "reserve".
- Pack Quantity: Suppose your product is only sold in certain quantities, e.g. bottles of wine are packed per 6, but you want to advertise with the price per piece. Customers can now only fill in a multiple of this "Quantity" when they add it to the shopping cart, but the "minimum quantity" will have to be completed later on the product editing page.
- Length or weight: In this case, your customer may also work with commas for 'quantity'. For example, you can advertise fabric with a price per metre and the visitor can fill in 3.25.
- Category: choose the (sub)category in which the product belongs. It will be found in that category from now on. (More information about this in chapter Categories /admin/categories)
- Supplier name: Type the first letters of the brand or supplier, e.g. Apple (more information about this in the section Suppliers /admin/suppliers).
- Part number: The SKU or product code of the supplier is listed here, e.g. MG4A2PK/A
- External ID: The internal code that you use for this product in your organization's database. It can therefore remain empty.
- Vendor name: If you work with a supplier can the name of this supplier can be filled in here.
- Vendor ID: If you work with a supplier, you can them unique internal product code for this product can be entered here
- EAN/UPC code: Enter the EAN code of the product here.
- Purchase price: Here we enter the purchase price excluding VAT. Attention, Always use a dot instead of a comma for decimals when filling in prices! You can leave these empty or fill in 0 to ignore them.
- Strikethrough price: optionally enter an old crossing price; e.g. 899.99
- Selling price: Here we enter the selling price excluding VAT.
- Tax class: Some products or services have more or less VAT, Recupel, Bebat and so on. Here you can select a pre-defined valuation (more info about this in configuration - Tax Classes /admin/taxes).
- Total stock: Enter your current stock.
- Minimum quantity: How many items does a customer need to purchase per order? Of course this is standard 1.
- Limit: What is the maximum number of items that customers can order per order? For rare products or limited stock, it is best to configure this. With 0 you ensure that there is no limit.
- Sort Order: In some cases, the order in which your products are displayed can be adjusted. 0 is standard and the highest priority. 1 will come next, 2 after etc... This field is not mandatory.
- Product Tags: In order to make your product easy to find within your site, but also for Google, you need to complete your tags as completely as possible. By default, all category tags already apply to the product, so you don't have to enter them here again, so you only need to fill in additional, specific tags for this product. e.g. in the case of an iPhone, tags such as Smartphone, phone, GSM, 4G, bluetooth... have already been added to the smartphone category, so here you only need to add tags such as '128gb, iPhone, 6, white, 128, 128 gig, 128 gig, 128gb.
- Active: finally, you can choose whether or not your product is active and visible in your shop.
Then click on 'Save' to save your changes.
All products that you create and offer online are reflected in the easy to search overview.
The overview shows us
- ID: each product is given a unique number in the platform, so you will see this number come back more often across the entire platform.
- Name: The name or title you have given the product. You can click on this name to edit the product.
- Category: The assigned category or subcategory in which you wish to display your product.
- Supplier: The assigned supplier or brand of the product
- Part Number: The SKU (Stock Keeping Unit) or a unique product code that your supplier assigns to the product, for example a Samsung Galaxy S7 is called 'SM-G930'.
- EAN Number: The EAN code stands for "European Article Numbering" and is also unique per product.
- Price: Here you can see your set price, excluding VAT.
- Stock: This concerns the current stock of the product in your branches.
- Ordered: This table gives you an overview of how often certain products have ever been ordered, so you can sort by them to see your (least) popular products.
- Updated: When was the last time a change was made to this product?
- Active: Gives you an image of products that are or are not shown on the site. By clicking on the green check mark you can deactivate or reactivate them by clicking on the red cross.
- At the top right you can press the button 'Export Products'. An Excel file is now generated and downloaded that contains all your products in the database. This Excel file will also be used later when we discuss the function 'Import products' (/admin/imports).
At the top of the page you can filter by Id, Name, Category, Supplier, Part number and EAN. If you want to show all products again, click on the red 'X Reset' button and all your search and filter settings will be deleted.
In the table 'options' on the right you can select individual products. edit with the pencil icon, remove with the trash can (they'll get to "Deleted Products"), duplicate with the copy icon and live viewing on your site with the last icon.
When we edit a product, we suddenly see that there are many more options. We divide it up into tabs:
- General (See Chapter Products, new product) But 2 things have changed. Now you will see next to "selling price" two extra buttons "Prices" and "taxes". And next to Total stock you will see "Stock manager".
- With the button 'prices' the platform will show you all the calculated prices for the different price groups, so it's useful to check if the right people are being offered the right prices. Attention: When you adjust a purchase or sale price, you can - after clicking on the button 'prices' - click on 'clear prices', giving the order to recalculate all the prices for just this product. this recalculation will take place as soon as you or a visitor consult the product on the site, and from then on you can consult the new rates by clicking on the button 'prices'.
- With the button 'Taxes' With 'New Tax' you can determine an extra tax for the product, such as recupel, reprobel, handling, import... You enter a name and determine what the tax should do: Does a fixed 'Flat' amount or a percentage quantity need to be added or deducted from the current price? Don't forget to push the disc to apply the tax. With the trash can you can remove an existing tax.
- With 'Stock Manager' You can manually manage your stocks and cost prices per location. If you adjust the stock or cost prices here, you need to press the diskette to save. You can see the total stock and by pressing the pencil, the platform will take you directly to the stock editor. You can find more information about this in the Stocks chapter.
- Description allows you to enrich your product with additional information. How you can fill it in with the content editor and format it with text, images, etc. We refer you to the chapter Tools -> Pages -> Page Content Editor.
- Summary: Provide a description of the product in as concise a form as possible. This should give you enough information about the product at a glance. Usually, this description is first displayed on a product page.
- Short Summary: Depending on your template, some products will be displayed on your front or front page. These should then be provided with some important features to convince people to click through. You can enter this teaser data here.
- Description: In this complete description you can put as much text and images as you like in it. This description will be displayed on the product page, depending on your template. Please note that it is not the intention to put all product photos in it, we will do this later on in the 'images' tab.
- Warranty: Depending on your template, a field with warranty information will also be shown, which you can include in this field.
Press the green 'save' button to save your descriptions.
- Inventory: This tab allows you to set discounts at product level that exceed the margins and discounts that are configured in price groups or categories and are therefore valid for all visitors!
- Tier Prices: This is a quantity discount: e.g. if your visitor buys 6 chairs, he gets them for the price of 5. You have to manually enter the total price per quantity. This is therefore not calculated automatically.
- Fixed Prices: You don't want to sell some products or services with discounts, or you want to put a kind of 'Euro-deal' on a product today? With a fixed price, everyone gets the same price. Only with a graduated price you can change this, e.g. "Today only: this washing machine at €399!", so all other discounts and margin settings are ignored.
- Discount: If all visitors receive a certain percentage discount on this product, you can determine it here, e.g. "today only: -10% on this washing machine".
- Marging: If you want to earn at least x% on the sale of this product, you can determine it here. The margins and discounts of price groups and categories are still ignored.
For more information on discounts, price groups and calculation, please refer to the chapter on pricing and price groups.
- ImagesA picture says more than 1000 words, so choose a high quality, well-kept product picture as your 'Main image'. This picture will be shown on the product page as the main picture and on the entire site as a product thumbnail. With the button 'Upload Image' you can upload a new picture for this. You can add more images to the 'product gallery' which will be shown on the product page. Click on 'upload Images' to add extra pictures.
- Features: Here you can enrich your product with unique features, or 'product features' that you have configured in this product category. In the chapter 'Features' you can read more about how you can create them, choose from your existing features and they will appear in the list of 'selected features', fill in the correct values and click on the green tick to save. With the red cross you can remove a certain feature for this product.
- Variants: When you have defined 'Viariants' and 'Variant Values' and your template is provided with them, you can indicate here the available alternatives for this product such as other available formats, colours... Attention, variants have no impact on the product price (see chapter Variants).
- PDFs: Depending on your template, you can add PDF documents to certain products and customers can then download the brochure or information sheet in their language. You will need to upload your PDFs first via the media uploador. Copy the new URL/Link of the PDF and then enter a title of the document under 'PDF files' and paste the URL. Click on '+add PDF' and the PDF will be available for download via the product page.
- Videos: Again depending on your template, it is possible to display videos on your product page, so a good video presentation of your product can be invaluable. Once you have found a nice video on Youtube, you can right click on it and select 'copy embed code'. You now enter a title of your video and paste the embed code next to it. When you click on '+Add Video', the video is shown on the product page.
- Labels: The striking labels that you have configured in the chapter 'Tools - Labels' can be selected here and placed on the product picture. These are not only shown on the product page, but everywhere where the product comes into view. It is not advisable to choose more than one label, but if you do choose more than 2 labels that are displayed in a separate place (see also chapter Tools/Labels).
- Related products: Finally, there are related products that are displayed near the product because they may be of interest to potential purchasers. These can be alternative or complementary products, e.g. for a printer, these can be a pack of paper, USB cable or ink sets. This makes cross- and upselling a lot easier, you can search by name or item number, and when you click on a result, it will appear in the 'Selected products' list. The red cross will allow you to remove the product.
/admin/products/trash - When you remove a product, it is not immediately lost, but it ends up in the 'trash', so you can still repair your products by clicking on the circular arrow. The trash can't be permanently removed, so we advise you never to remove products permanently, because if it doesn't work, it won't harm you. The trash is never automatically emptied at the moment.
/admin/promo-products - Depending on your template, you will have a 'Promo' page or promo products will be highlighted on, for example, the homepage. You can choose up to 12 products in this module, which you can find by selecting your categories and subcategories, or by searching by name or product ID. When you click on a result, it will appear in the list of 'Selected Products', where you can drag the order of the promo's with the arrow icon on the left, and with the red cross on the right, you can remove the products again.
Suppliers
(1st item will not be displayed)
/admin/suppliers - Each product in your webstore is linked to a specific brand or supplier, which we call the 'suppliers'. On the page yourdomain.be/brand All these suppliers are shown, you can search by 'supplier' and individual product pages are enriched with the logo and/or description of this supplier, depending on your template.
To create a new supplier, click on "+ New Supplier" in the top right-hand corner, first enter a name and then choose to refer to it as "Sponsor", choosing whether or not to display it on the site on the overview page yourdomain.be./brandAs a final step, you will need to upload a logo or photo from your PC, preferably in a square format. However, our platform will automatically scale your uploaded image in proportion to the size of the PC. This logo will always be displayed on the relevant product pages. Click on Save to create the new supplier or cancel to cancel.
In the overview you can see the new and existing suppliers, you can filter on ID or the name to quickly find the right supplier and you can also easily indicate and change them as a sponsor. When you change a supplier with the pencil you will see the new option 'remove image' with which you can still hide the logo on product pages. There is also a 'description' provided for all languages, which -depending on your template- will be displayed on the brand page and/or on the product page or other places, how to place this description.
Don't forget to click on 'Save' to save your changes.
Categories
(1st item will not be displayed)
/admin/categories - It is best to divide your products or services into categories and, if necessary, subcategories. This makes it easier for your visitors to search your catalogue and gives them an immediate overview of what you have to offer them. These are often displayed as prominently as your main menu, depending on your template. Moreover, a page is generated automatically. www.uwdomein.be/catalog In addition, search results are also broken down by category.
You can create a category or subcategory by clicking on "+New Category" in the upper right corner. When you click on it you first have to do the following in all your active languages:
If your category name is very long, you can also optionally enter a shorter 'Short Name' if your category name is very long, this short version will be displayed in the platform in long lists if necessary or if there is a lack of space. You then select a 'google category' with which this new category corresponds as closely as possible and Google will include your products in 'Google Products feeds', so that your shop and products can be found even better and included in the Google Shopping platform. Finally, there is the Description, or 'description' of your new category, which will be described depending on whether or not you have a new category.
Then we go on to "General options" where we will enrich the category with information:
- First we choose a category photo that is preferably square in size (600x600px), this photo will be displayed on the page yourdomain.be/catalogue
- Parent Category: If it says no parent category does this mean that we have a new chiefWe can also designate a new category as a subcategory by choosing an existing category as 'parent'. E.g. If we create a category 'smartphones', we could place it under the category 'electronics'.
- By order we determine the order in which this category is displayed in the list of categories and subcategories. If you choose 0, this category will be displayed first, if you set another category to 1, if you set it to 1, if you set it to 2, if it comes after 1, etc... If there are several categories in the same order number, they will be sorted in that location according to the order of their creation date.
- Finally, for this category, we need to fill in the "Category tags", always with a comma in between, so that the products in this category can be found through these terms, useful for the search function on your site, but certainly also for Google, which will take these tags into account, so for the category 'smartphones', you could fill in terms such as 'smartphone, android, ios, windows phone, handset, mobile phone, mobile phone, mobile phone, etc. General terms that will apply to all products in this category, a good tip for all the products in this category.
Then we come to 'Price filters': When customers search your products, they like to determine their own budget in order to eliminate options that are too expensive or too cheap. depending on your template, the category product overview will either show 2 fields in which they can determine their minimum and maximum amount, or there will be a slider that allows them to easily move between a predetermined minimum and maximum amount, in which case we will have to fill in the Price filters; we will determine for your visitors with 'filter minus' what the minimum amount is and with 'filter max' what the maximum amount of the products in the category is. With 'filter max', we will determine the maximum amount of the products in the category.
There are also 'Discounts and margins' where you can give a percentage discount at the category level and then you can communicate in your marketing 'today -10% on all smartphones!' Your safety margin will of course always be respected so that you will never sell below purchase price. Attention, if you change this discount, you have to click on 'Clear all prices' in the top right-hand corner of the wrench to recalculate the existing prices of all the products in this category. More information about this can be found in the chapter Pricing (/admin/pricing).
When you click 'Save' your new category is created and included in the overview. Now products or new subcategories can be linked to it.
In the overview you can see all existing main categories and you can search them with the filter at the top; the order of display on your site; in the category menu and on the page /catalog, you can determine in the column 'order': '0' is first displayed on your site, then '1', then '2' and so on; you can also filter your categories by active or inactive and easily (de)activate them; in the column options you can click on the subcategories if available, edit the category with the pencil or delete it with the pr.
Features
(1st item will not be displayed)
What are Features?
When we put a product on the market, visitors want to see detailed information on the product page; for a television it is important to know how big the screen is, but also the exact dimensions in millimetres, the screen type, the weight in kg, etc. All these 'features' will - if properly configured - be clearly displayed on your product pages. In addition, visitors can also use this wealth of information to compare similar products one-on-one in a clear table. Also, when you create a new product, these features can serve as a reminder so that when you create a new product, these features can serve as a reminder to help you.
Attention, it requires a good preparation and thought exercise in advance to determine:
- Which features will you want to show and for which product category(ies) are they relevant?
- What unit formats will you need? Such as Kg, mm, Rpm, GB, °C...
- And last but not least: when products have a lot of features it can be useful to divide them into groups in order to keep an overview. How will you divide them up and what will you call these groups?
/admin/features - This list contains all the features you have ever created.
Click on "+New Feature" at the top right to create a new feature such as 'screen diagonal'. First you choose a relevant measure or measure. You can type in this field to search the available measures. If you don't want to use a measure but later for example yes or no, or to fill in a free text field without Kg or mm behind it, you choose the Measures 'Y/N' or 'Text'. These features will not have a suffix.
Once you have determined the correct measure, you can enter the title of the feature, e.g. 'Screen diagonal', in all available languages. When you click on 'Save', the feature is created and appears in the overview.
You can sort them in the first column by their unique ID, feel free to consider this as a creation order. You can also sort them and search them by name. When you click on the name or the pencil icon, edit the corresponding feature.
/Admin/feature-groups - Some products, such as smartphones, have an enormous amount of features. In this case, it is useful to classify all these features in order to keep an overview, e.g. Length, width and depth can be sorted into a group of "Dimensions" or "Dimensions".
Here we can only create and edit the groups, assigning the existing features to these groups will be done later at 'Category features'.
Click on "+ New Feature Group" to define a new group; first the product category to which this feature group can be applied is asked. If you want it to be applied to all categories, you can do so too, but we will come back to this in a moment. Once a category has been chosen, we will give the new feature group a clear name in all languages as it will appear on the product pages, e.g. "Dimensions". Click on Save.
In the overview you can see the existing feature groups, which can be sorted by their unique ID, to be considered as creation order. You can also sort and search them by name and you can also see the category in which the group is active and the number of features that are linked to this group. In the column 'General' we see a red cross or a green tick. If 'General' is active this means that the group applies to all categories and products, because when we click on the pencil to view the group, it means that the group is applicable to all categories and products.
/Admin/measures - Here we can manage and translate existing unit formats. You will get a whole list of pre-defined measures and you can adjust them as you wish. It is best to fine-tune this list before you start creating new features so that you can be sure that you have the right unit format right from the start.
/Admin/category-features - When the preparation of Features and Feature Groups is done we can link the created features to existing categories and feature-groups. Click on "+New Category Feature" to set up such a link.
- We choose an existing feature such as "Screen Diagonal".
- Choose a category in which the feature can be presented like "televisions".
- We choose the Feature-Group as "Dimensions".
- And last but not least, as a Measure we give "Millimeter" in this case.
When we go to a product in the category 'Televisions' and we edit the product, you will see in the tab 'Features' a search field in which you can see only the relevant features for Televisions, divided into the configured feature groups. Click on a certain feature to add it to your product and fill in the value. For "Screen diagonal" you need to enter a value in millimeters and then you can save the value by clicking on the green tick.
Stocks
(1st item will not be displayed)
/Admin/Stocks - Disclaimer: In order to fully understand stocks, it is advisable to read 'Warehouses' and 'Stores' first.
In Stocks, we get an overview of all products and their stock. Usually, stock is fed from your company databases or ERP in the Webstore platform, but you can also add stock manually by clicking on '+ New Stock'.
First choose the Store location (= Store name (+Store code number)) where this stock was placed and then choose the product of which you want to add stock. By typing the product ID or (parts of) the name of the product you can indicate the correct product.
Then fill in the amount of stock and the purchase price per product. Attention: this amount is exclusive of VAT and can be with decimals, but use a dot instead of a comma to indicate decimals, e.g. '15.4'.
When you click on Save, the stock will be replenished and you will be redirected to the stock overview. Here you can search or filter your products by specific storage locations to view the current stock and purchase prices. Finally, you can manually edit the stock by clicking on the pencil.
TIP: You don't have to go to Stocks to replenish your stock, you can also click on 'edit product' when you are on a product page. In the first tab 'General' you will see the button 'stock manager', where you can add new stock or adjust the current stock at the desired locations, the purchase price can also easily be changed here, but don't forget to click on the diskette to save your changes. If you would like to move a stock of the product to another storage location, then you can click on the pencil to change the storage location.
/Admin/warehouses - Customers will be more likely to be convinced to order if they see on your product page that the product is in stock and therefore delivered quickly. Your webstore can display these indications.
It is also possible to offer the option of 'picking up' in addition to the classic shipment, so that a customer can order online and, for example, drop by your shop on the way home to make use of the purchased product that very evening.
The stock indication on the product page as well as the pick-up addresses that we will communicate with the customer will be defined here, in 'Warehouses'.
Ask yourself these 2 questions:
- How do I communicate my stock on the product page?
Or would you like to display this indication per location or even per supplier? - Do I give the customer the option to pick up from physical locations?
When you have made this decision, you can get started.
Click on '+ New Warehouse' at the top right. First the system asks for a clear name of this stock location: e.g. "Shop Turnhout" this name will be shown to the visitors, possibly followed by the address or short description of this stock location.
At "stock upper limit" you determine the amount of stock that must be available to give a green "on stock" indication for this location. If there is less stock at this location, there will be an orange exclamation mark next to the location with the warning "last piece(s)". If there is no more stock, there will be a red clock with "no stock".
Finally, you can activate your new stock location and indicate 'Show in pickup location list' as 'physical pickup point', so that customers can choose to pick up their product at this point during the ordering process.
When you click on 'Save' the new 'warehouse' is created and you enter the overview list in which all created warehouses can be searched, sorted, or (de)activated. With the check mark 'pickup' you indicate whether people can pick up their products there or not, and with the pencil you edit existing warehouses.
/admin/stores - Stores are the 'behind the scenes' storage locations that are very important to you, but irrelevant (and therefore invisible) to the visitor.
Suppose you have a number of branches (Warehouses), with specific rooms, in which there are separately labelled racks containing your product stocks. You can transfer this layout to the Webstore platform, as extensively as you wish, and each of these storage locations will be linked to previously created 'warehouses'. Visitors will then be shown the total sum of all the stock at linked storage locations per 'warehouse'.
When we click on '+ New Store' in the upper right corner, we fill in the following fields:
- Store name: A name of this physical storage location that is recognisable to you, such as "Space B - Rack 3A".
- Warehouse: Here you can choose in which branch or at which supplier this stock is located.
- At address you can add an address or description of this storage location without any obligation.
- Store Code Number is a code of establishment (as defined in your company database or ERP), e.g. 'Turnhout', which can be the same as 'Store name'.
- Store bin number is a code of the physical location in this location, e.g. 'B3A' or this can be equal to 'Store name'.
- With order number The storage location with the lowest number will therefore be the first to lose stock for online orders.
Finally, you decide whether or not this storage location can be activated and click on 'save'.
Once back in the overview list, you can sort and search through all created storage locations; change the 'Order number' by typing a new number and clicking on the sync arrow; (de)activate or change the storage locations. By clicking on a warehouse, you can edit it.
Tags
(1st item will not be displayed)
/All tags that you have linked to products and categories can be searched here; both the 'Product tags' and 'Category tags' tab have a search bar at the top and in the 'Usage' column you can see how many products or categories carry a specific tag; when you click on the arrow in the 'Options' column, the platform shows you the list of products, categories or subcategories with the relevant tag; as far as products are concerned, this way you can put tags on active or inactive, or even remove them, without having to open the product in question; and this way, it's useful to have a neat and easy to open your database.
Variants
(1st item will not be displayed)
/Admin/variants - If you sell a product that is available with small differences in e.g. colour, size or finish without these variations having an impact on the price, you can use 'Variants'. Customers can then - if your template is equipped with this - easily choose the correct version of the product without leaving the product page.
In the Variants List we can click on the button "+New Variant" in the upper right corner. Here you enter the name of the variation in all the applicable languages, e.g. "Color". Then click on Save to save this new variation.
Back in the overview you can see your new variant in the list and you can sort the existing 'variants' by their ID or by name. In the third column you can see the 'Values count', where we will immediately see the number of options to be selected, e.g. 3 colours: red, white and black. In the column 'Usage Count' we can see later how many products this variant applies to, i.e. how many products offer a colour variation?
The last column offers the possibility to rename the Variant with the pencil or to remove the Variant with the trashcan. New is the list icon on the left with which we are going to create the 'Variant Values', which - in this case - are the available colour options.
When we click on it we will enter a new sublist and by clicking on '+New Value' at the top right we can create a value. Enter a color name, e.g. red in all languages and click on save. Back in the overview you will see this new value and how often it has already been used on products. With the pencil you can change the name of the value and with the trashcan you can remove the value.
Important to know It is only later when creating or editing products that we will only indicate the (colour) values that apply to that product.
Click back at the top right to go back to the Variant list. You will see that one Variant with one value has been created.
When we are creating or editing a product we can select the option 'variants' in the tab 'Variants' at the top right of the page. We now see the variations with the available values or 'values'. Indicate the values that apply and the changes will be automatically saved for this product.
Finally, the 'Values List' ( /admin/variant-values ) gives you an overview of all the values available on the platform.
Orders
(1st item will not be displayed)
/Admin/orders - Every order that passes through your webstore is listed here. The list can be sorted by ID, ERP-ID, creation date and the total amount. You can also search by Order-ID, ERP-ID and customer name.
Together we cross the columns from left to right:
The ID is a unique reference number that has been assigned to this order in the Webstore platform; the ERP-ID is the unique reference that has been linked to the order within your own database; the customer is the customer; by clicking on his or her name you edit the order, not the customer; in the column 'Created' you can see the date of the order and the table 'Total' shows the total amount of the order; in the column 'Status' you can adjust the processing phase; in the column 'Status' you can see the platform's way of payment; and in the section 'Shipping method' you can see the way in which the customer has paid or will pay:
- With the pencil you can check the order extensively and adjust and complete it here and there. We will come back to this in a moment.
- With the Up Arrow you can - once you have checked all information - send the order to your own company database. When the icon is black, the order still has to be sent, when it is blue, it has already been sent to your external database. This is a manual action so that cancelled or changed orders would not pollute your database. You can press this arrow again and again to send a duplicate of this order to your database.
- Finally, there is a mail icon with which you can send your customer the mail template 'order survey', e.g. to ask if everything went according to plan (more information about this in configuration - Email templates). After sending, this icon is filled in black so that you cannot accidentally send the mail twice.
Edit order
When we click on the pencil to edit an order, you can add or change information to a limited extent; we see the order details in the first tab; only a few fields can be edited here; you can add your own reference to ERP ID, so that you can always find the order in your bookkeeping; you can then - if necessary - change the payment method by choosing from the drop-down list; an exact 'shipping cost' (e.g. how many payments have been made but this is certainly not an obligation); an exact 'shipping cost' (e.g. how much is required); or a 'payment method' (e.g. how much is it?); or an exact 'shipping cost' (e.g. how much is required for the shipping process); or a 'payment method' (e.g. how much is required for a specific shipping cost).
In the case of Contact info, we can also complete additional data or company details. The billing address tab relates to the billing address, where changes can also be made and an external reference, to the External ID, can be added. For example, you can add the invoice number from your accounting records.
The "delivery address" is usually the same as the billing address. If it does differ, it can be checked or edited here.
Finally, in the tab, you will see the total list of 'Ordered products' which includes all the items related to this order. You can click on the links in the 'product name' table to edit those products. When you are on this product editing page, you can view the products on the site by clicking on the permalink at the top of the page.
For your information: When customers are logged on to your webstore, they can follow the status updates of their orders under 'my orders'.
Tools
(1st item will not be displayed)
/Admin/banners - Your homepage is the most visited page. The Webstore Platform offers you a rotating banner in which you can put multiple products or services in the spotlight. To create a new banner, click on '+New Banner'. First choose the image from your computer that you want to use. Attention, the physical pixel size or at least the aspect ratio of your banners should always be the same as the previous banners for a smooth result, then enter the link where the banner refers to when users click on it. Fill in a title and subtitle banner.
In this overview you can search for the titles of existing banners at the top of the page and also determine the order in which your banners are displayed on the homepage. This order goes from low to high where the lowest value, being 0, is displayed first. You can also activate or deactivate banners, e.g. easy to reactivate a sales banner during sales periods. You can also use the pencil to show your banner, edit the banner with the eye, and use the trashcan to permanently remove the banner.
Tip: We recommend that banners are always designed by people with a graphic background.
/Admin/blogs - "Content is king" and by writing a news item from time to time, you give both your users and Google the impression that there is regular renewal on your site. it's useful to highlight products, services or, for example, open days, or to announce closing days on the /blog page; when you click on "+ New Blog" at the top right of the page, you can first choose whether you want to allow reactions of visitors; if so, they can use their Facebook profile to ask questions or comment on your news, and then you can give them a title in the top right-hand corner for each language.
Attention: If your template requires it, you will need to add an example image; when you click on the edit pencil, you will notice that there is now also a 'Featured image' at the top of your blog. By clicking on this image, you can add a suitable image to your blog and you will also see the 'Permalink' that always refers to this news. You can use this link on pages or in your menu, or parts of your menu or via social media and newsletters to refer to this news. You can change it, but of course, you can do this before you start sharing the link.
/Admin/collections - Collections are collections of products with the same tag, such as sweaters, t-shirts and trousers, but it is easy for visitors to click on 'red' in a list of colours, which means that only the red products are shown to them. Behind the scenes, a search is automatically carried out for them using the term 'red'.
Click on "+ New Collection" in the upper right corner to create a new main collection, such as "Seasons", click on "Save", you can always delete this collection with the trashcan or edit the name with the pencil, when you click on the eye we will create collections, click on "+New collection item" and then fill in the tag to be searched for, e.g. "Autumn", depending on the tag you have added (or will add) to the products in question, with "Sort order" you can determine the order of the collection, depending on the tag you have added (or will add) to the products.
Once back on the page 'Collection items' you will see the url yourdomain.be/admin/collections/items/id/1The last number is important, because on every page where we [collections]1/collections] types, your collection of 'Seasons' will be displayed.
/Admin/coupons - Create a discount code that you can use in your marketing such as banners or advertisements as a bon/coupon. These codes can be used by multiple users to obtain a certain discount during the ordering process.
You can create your own code and choose whether it is valid for the entire product range, only for one brand, one category or one product, or whether the discount is calculated per order or per product in the order. Enter a description (for your own reference) and expiry date. At 'Discount Type' you can choose whether you want to give a fixed amount or a percentage discount, then enter the value of the discount code and a minimum amount when the code can be used, so that you can play safely and say "If you order from €500, you will get a €50 discount with this code!".
In the overview you can view the configuration of all discount codes, activate or deactivate them or edit them by clicking on the pencil.
/Admin/labels - Here you can configure striking messages that are placed on top of your products such as 'Promo', 'eco-cheques', 'Solden', '€10 Cash-back', 'last pieces'... When configuring an individual product you can then choose these labels. By clicking on the button '+ New Label' at the top right of the screen, we can create a label.
First, select a reference name that is relevant to you, e.g. 'Open day promotion', choose a specific colour and determine the position of the label on the product image. Finally, you can set the effective content of the label, e.g. 'Stunt!', in all your available languages. Of course, your reference name can also be the same as the content of the label, and finally, click 'Save'. When you are now editing a product, this new label will be available in the 'Labels' tab.
In the overview you can search the existing labels and sort them by name, background colour and their position on the product photo. In the last column you can edit your labels with the pencil or remove them with the dustbin.
/In this overview you can see all available menus. Generally, templates have only one main menu, but depending on your needs, sometimes an extra or alternative menu is provided. This is preconfigured by VanRoey.be, so on this screen you don't have to change anything. To edit the content of your main menu, don't click on the pencil at the top of the name of the menu. At the bottom of the screen, you won't see all the current menu items listed, the links to which they refer and the order in which they are shown.
You can add a new menu item by clicking on '+New Menu Item' in the upper right corner. Here you can choose a name of this menu item e.g. 'Contact page'. Next you enter the link to the page in question and at the bottom you choose the term that will be displayed on the site in the available languages, e.g. 'Contact'. Click on Save and your menu item is activated.
Attention: after changing your menu or menu structure, you should always clear the cache to see the changes in your webstore. Click on the nut key in the upper right corner and click on 'Clear Cache'.
Pages: General
/Your webstore contains automatically generated product pages and news from the blog as well as static pages such as Home-, info-, faq-, or contact pages. You can also use your webstore as a website and create as many static pages as you like. in the overview you can search through all your existing pages at the top, (de-)activate them, view them in a new window, edit them with the pencil or delete them completely with the trashcan.
Adding a page can be done by clicking on the "+ New Page" button in the top right-hand corner of the page. First you will be asked to activate the page, so leave it on "Yes", below which we will fill in the page title in all available languages and create the page with the "WISYWIG" (What you see is what you get) content editor, which will be discussed in detail in the topic "Page Content Editor".
If the content is okay, click on 'Save', the page is ready and is now in the overview. When you edit the page with the pencil you will see the 'permalink' e.g. www.uwdomein.be/page/contact.. Also when you visit the page you will see this link in the address field of your browser. It is up to you to place links to this page in your site, for example by creating a link in a menu item or by linking to this new page from another page. The permalink can be shared via social media or newsletters. The permalink can be changed but the permalink can also be changed.
AttentionYour homepage and footer are deactivated by default and that's how it should be. This way we prevent the links /page/homepage and /page/footer from becoming available as this can cause confusion among visitors.
TipYou can also edit a page by -when you are logged in as administrator- visiting the page in question and clicking on [Edit] at the top of the page.
Our webstore platform allows you to change the content of pages or news items yourself using our Content Editor, which works intuitively and recognizably as in Microsoft office Word. We always recommend that you create a draft/test page in which you become familiar with the editor. Rest assured, in such a test page, nothing can damage you.
The tools you get are available, from left to right:
- "If you typed something wrong or deleted it by mistake, you can always take a step back.
- "Redo" You have undone something and still want to go back to the previous version, then you can take a step forward.
- With 'Formats' you can choose whether a piece of text should be displayed as a main title (H1), subtitle (H2), sub-subtitle (h3)... Plain text, also called paragraphs are always a Block -> p. A quote or striking piece of text can be highlighted in containers -> Blockquote. Again: feel free to try out all styles on a test page to see the result on your site.
- The thick B to put letters in bold (Bold)
- The slanted i to make letters Italic
- Aligning the text: left, centered or right aligning, or filling (not recommended)
- A list with, when you press the little arrow, a few more options.
- A numerical list, also with some options such as roman numerals or letters.
- Add tables with a number of rows and columns of your choice. Here too you will find many extra options for inserting rows or columns, splitting or merging cells, etc. Here too you have many options that you can discover in a playful way.
- Add a link: first enter the link to the page in question: "/page/faq" and then type in a word or phrase that will be clickable e.g. "Frequently asked questions". Title is invisible to users, but it is useful for Google and blind or visually impaired people, who will read out these "metadata", so enter here e.g. "Click here to read our Frequently Asked Questions". At target you will be asked whether the link should be opened in the same window, in a new window or in a new tab, and we recommend that you type in any link that will lead to a link that will be clicked to a page.
- Remark: within your own webstore you never have to http://www.uwdomein.be It is sufficient to start with /page/... The webstore knows that it stays within the domain. Màr, do you want to link to another site? Then make sure http://...... For the link.
- Remark: You can also select existing text and images and click on the 'Link' button.
- By clicking on the photo icon we can add images to the page, preferably from the webstore platform, e.g. images that are in the platform via the media uploader, via the banner tool or even as product images.
First he asks for the 'Source', which is the direct link to the image. This link can be found in the media uploader or by right-clicking on existing images and (in internet explorer) clicking on 'properties' or (in Google Chrome) 'copy address of image'. As Source you then enter, for example, " /media/fotonaam.jpg " or " /image/product/thumb/fotonaam.jpg ". In the image description section, you enter a short description of the image. Again: this description is not visible to visitors, but is used by the user. - < Source Code is for advanced users with knowledge of HTML to make the page even more precise. If your template is responsive, bootstrap is supported to easily divide your pages into rows and columns so that they can be repositioned to your liking on tablets and smartphones. A cheat-sheet for this can be found at http://getbootstrap.com/css/
In addition, you can enrich your pages with dynamic content using a few 'shortcodes'.
- If you want to display a 'collection' at a certain point within the page, please use the short code: [collections]#[/collections] where you replace # with the ID of the collection (see collections)
- If your template supports it, you can also display some product snippets on your page. This is a brief representation of up to 12 relevant products with a certain tag. You can do this by using the code [product-snippet] items=12 random=1 tag=solden[/products-snippet] With 'Items=' you determine the amount of products to be shown. With 'Random=' you determine the order: 0 concerns the standard sorting, 1 shows the random products in a random order. Finally you determine with the tag which products should be shown. You can also category=# where you fill in the ID of the category.
- Forms that you have prepared in the FormBuilder can be displayed with the code form]#[/form]Where you replace # with the number of the Type-ID in Form-Builder.
Finally, we would like to give you some extra tips on how to fill in the pages:
- Sometimes you paste text from Microsoft Word, a PDF or from another website. It can happen that this text contains all kinds of formatting that you do not want to copy. In this case you can paste the text with ctrl-shift-V (e.g. in Chrome). You now only have the text and all images, links, tables... have disappeared.
- You can align inserted images - just like text - and place them e.g. to the right of a text.
- Don't start with the translation until your main language is completely filled in and formatted with all titles, images, links... Then copy and paste the HTML code integrally into the new language. This way, you only have to go through the formatting process once and only the translation remains.
Don't forget to click on 'Save'.
/Admin/showrooms - Does your brand or product have several branches, dealerships or (online) distributors that you want to show on the map? If it was configured for your theme, you can use 'Showrooms' to show them all in a searchable map on the page /showrooms. When your visitors click on a branch, they immediately see the address and specific contact details underneath the map.
With the blue green button "+New" you can add a new distributor and enter the name of the distributor or branch. The Ext ID can be a unique code that you use in your own company databases as a reference for this branch. If it is a physical location, select "Yes" at has location. Complete the address with street and number, enter the zip code and the city/residence and choose the right country. Finally, enter a phone number, e-mail address and website. If it is (also) an online shop, then you can answer the question "What is the name of the distributor or branch".
Your new dealer is now in the overview where all dealers are easy to search. You can also (de)activate them immediately.
When you save a branch with 'has location' Yes, you have to press the pencil again to edit the location. Now you will see an automatic estimate on the Google map. Sometimes this location can be wrong, but when you click on this map you can move the pin to the right location.
For organizations with many branches, there is also the import button. From an Excel document, you can push all values to the webstore platform, making the management of hundreds of showrooms easier.
.
/admin/media - With the media uploader you can add images to the webstore platform. By clicking on the 'Choose file' button you can choose a file from your device. The file formats BMP, Jpg and Jpeg, Gif and Png, PDF and SVG are supported, by default there is a limit of 8MB per file, which we can only increase if absolutely necessary, and then click on the green 'upload' button to send the file to the platform, which now appears at the top of the overview list.
In the overview you can see all media files that have already been uploaded with the corresponding link to the file next to it. At the top you can search by name, so it is always useful to enter the file name of your image in a comprehensive and correct manner, not only for Google, but also for you to easily find your images afterwards. So do not call your file "DSC_123.jpg" but "Front-Shop-Mechelen.jpg" even before you upload the file. Already uploaded files can no longer be changed by name, nor can you delete them.
Attention: the platform automatically reduces oversized images and always converts BMP, animated or still Gifs and PNGs to a static, compressed .jpg. These formats are therefore not recommended, and we take these measures on the one hand to save your data traffic and thus keep the price of your hosting as low as possible, and on the other hand to offer users a webstore that is as fast and compatible as possible. For video, we refer you to online platforms such as Youtube or Vimeo, which offer you an 'embed' code that allows you to embed the code.
Watch out, too: It is NOT the intention to upload product photos, brand or category images here. This can be done when creating new products, brands, categories...
/Admin/vouchers - A voucher is a one-time discount code such as a gift voucher or a shop credit that can be used only once within 1 year. In the overview you can filter on code, the sender or the recipient to find vouchers, view the remaining amount "Current amount" and the expiry date or (de)activate codes. With the button "New Voucher" you can determine the amount, your name and name and email of the beneficiary and we will immediately return to delivery method. At "Sender contact info" you will see your name and email address.
To allow visitors to create a gift certificate or voucher you can provide a link to 'yourdomain.be'."/voucher. Here the visitor gives all the necessary information and can pay the voucher immediately. If you want to propose an amount it suffices to go behind the url 'yourdomain.be/voucher'.amount=50This will automatically propose an amount of €50.
Configuration
(1st item will not be displayed)
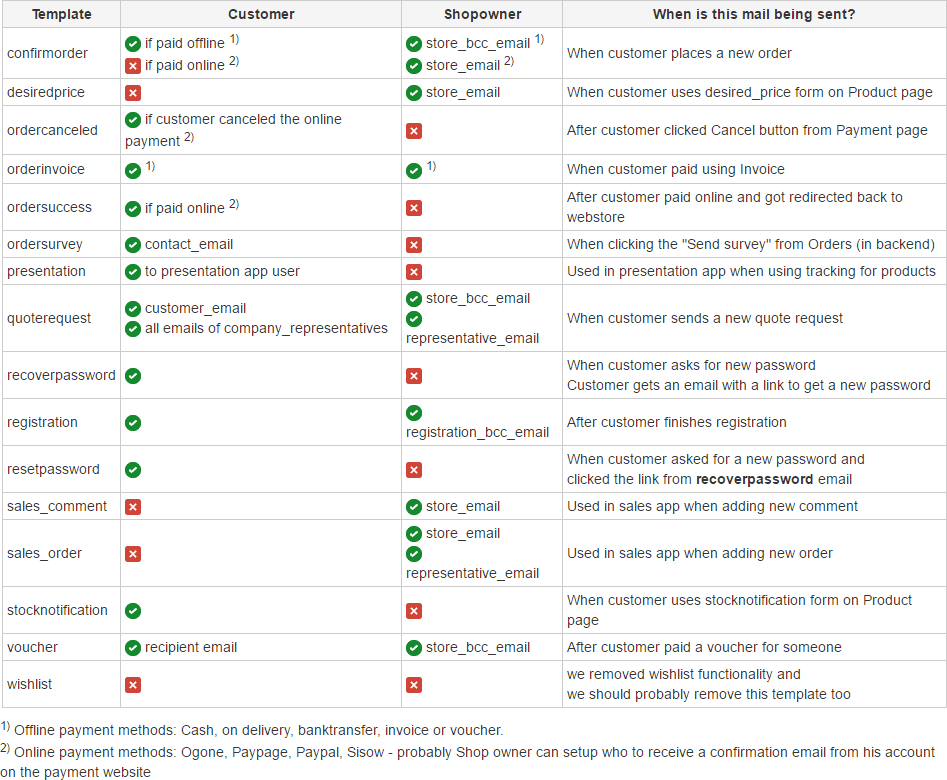
/The platform informs you and/or users of certain events by e-mail. An overview of when which mail is sent is shown below. Each mail is cast in a certain template that you can view and edit by clicking on the name or the pencil if desired.
In the editor you can change the subject and the content of the mail for all languages. You can use html for layout, images from the media uploader and place wildcards (between %). The customer name, his order etc. will be filled in automatically. Preferably use our templates as a basis.
Tip: If you want to change a lot of things in HTML, first make a backup of the code and study the current code (e.g. the tags are very important). Note: Not all formatting code is well supported in all mail clients.
Attention, Webstore is not a marketing platform that allows you to send thousands of advertising emails, using tools such as Mailchimp, Addemar and the like...
/Admin/languages - The overview of the languages you use on your webstore, which is usually preconfigured and should not be changed here. You can set or deactivate a language as the default so that visitors can no longer select it. You can use the pencil to change the name of the language, the language code but also the "external ID", which you should fill in when you import texts via external content providers. A tip: Before you start building up and filling in your webstore, you should think carefully about which languages you want to offer. Considering these languages, it is best to consider which languages you want to offer.
/Admin/payment methods -Does your customer pay online or when picking it up in your shop? The webstore platform supports it all and allows you to (de)activate and configure payment methods. This configuration is usually done by us, when payment services such as Ogone, Sisow or Paypal ask you to renew your code or authentication URL you can go here. Don't forget to save your code or to test it in detail if there are any changes!
/Admin/shipping-methods - There are several ways to get an order at the customer's place of business: by shipment, pick up at your place of business, pick up at postal points etc. Here we can (de)activate and configure these methods. With 'order' you can change the order of preference of the methods, with the lowest value being the highest preference, after which you have to click on the arrows to apply them. When visitors are presented with the options, they will be displayed in that order.
Shipping countries and rates can be determined at the gearbox, at the top right you can add countries, with the trashcan you can remove them or you can edit and save shipping costs per country with the floppy disk. Per country you can -including VAT- determine the standard shipping cost and at "Shipping Cost Limit" we can determine the amount that needs to be exceeded in order to get free or cheaper delivery, you can fill in the alternative rate at "Low Shipping Cost" and you can determine the estimated minimum delivery time in working days, where the value of 1 is for 'next business cost'.
/Admin/translations - Menus, buttons, messages or notifications throughout the platform, you can provide your own text in all languages; to find the right elements or text, you can filter in the 3 empty fields at the top by categories and/or individual items, or enter parts of the existing text under 'value'; by clicking on the text field, you can change the text; click on the green tick to save your change or on the cross to cancel; at the top right, you can switch between the available languages; Wildcards and basic HTML are supported in these fields for automated content and on 'value'.
Updater
(1st item will not be displayed)
/Your shop, but also our FormBuilder, SalesApp, PresentationApp and the like receive new functionality and bug fixes on a regular basis in order to make it work even better. You can't configure anything here, but it does give you insight into the evolution of the platform.
Updates are fully automatic without you or the visitors noticing anything about it. So you are always provided with the latest new and especially safest You have nothing to worry about. Moreover, all customers, including you, immediately benefit from the customization and new features that we have developed for other customers.
First aid & Troubleshooting
(1st item will not be displayed)
The webstore platform usually works fine in all browsers and on all devices. However, with regard to the back-end (where you configure everything behind the scenes), we officially support and test all functionality only in the browsers. Chrome and Firefox.
If you experience problems with Internet Explorer, Edge, Safari or other browsers, it is recommended that you work in the supported browsers. If problems persist, you can try to delete your temporary internet files. If you or a colleague experiences the problem on another PC, with another browser or even on another network, please contact our support.
An adblocker such as Adblock or µBlock may be a problem here. It is recommended to ignore your own domain or 'whitelist' it for the adblocker. Temporarily disabling your adblocker can also be a rescue measure.
In the webstore platform we work with a 'cache', a temporary memory that serves to give users faster access to pages and products. when you make major changes in the layout or menu structure of the site, this cache has to be rebuilt, so after every change it is recommended to check the result, if you don't see any effect yet, you have to empty the cache by clicking on the wrench in the top right corner of the backend and then indicating 'Clear Cache'.
All prices in the platform are cached in order not to burden your site too much, i.e. calculated in advance and loaded into the memory so that they do not have to be recalculated over and over again. The drastic speed gain that we achieve with this will have some consequences:
- When you assign a user to another price group via the menu item "Users" (see chapter "Users"), this user has to log in and out once more before he or she will see his or her adjusted prices.
- After changing a margin or discount on a category level the admin has to click on 'clear prices' in the upper right corner. All prices throughout the platform will then be recalculated.
- After changing a margin or discount, or setting a fixed or staggered price for an individual product, you need - when changing a product - to press the button 'prices' in the general tab and then 'clear prices' to provide the product with the new price setting. The new price is calculated when the product is shown on the site.
The user must log in again once before the new rights apply.
Most elements within the Webstore Platform require that only your 'default language', i.e. your main language, be entered. With labels, however, you need to fill in all available languages.
The footer (just like the homepage) is considered as a separate page and can be found on your domain.be/admin/pages.
When you are on Tools > Pages If you see that the footer and the homepage are special pages that need to be deactivated, we prevent Google from finding its way to the pages www.uwdomein.be/page/footer and www.uwdomein.be/page/home, with strange results for the visitor as a result. You can edit the content of these pages here, even if they are deactivated.
Remark: If the page 'footer' is not yet in the list of pages, you will need to create a new page, give it the name 'footer' and put the page on hold. When you save this new page and edit it again, edit the existing footer.


